viernes, 31 de diciembre de 2010

Last bread of the year: halloumi and olives bread


I am down in Cork spending a few days with my friends Philippe and Gianmaria, who have hosted me in their house for new year . So I promised them to bake some bread for tonight dinner, new years eye dinner. I wanted to be safe so I chose the olives and garlic bread I made recently. One of the best breads I've ever baked. But there is another part of me that always want to try new things and be very creative (too much sometimes) so I normally change even my own recipes.

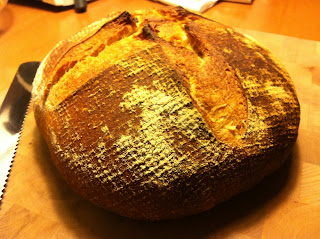
When I went to buy this morning the bread flour, I decide to buy as well some rye flour to give more flavour to the bread. Not a big risk. Then I went to the olive shop and my eyes went straight to some black moroccan olives, so I bought them instead the greek style ones. Not to bad so far. Finally, I remember that this cyprus bread is made as well with one of the most popular and famous food from this island: halloumi cheese. Why not? I though. So, I was literally paying for the cheese in the shop when just in front of me there was a nice tin of hazelnut oil and of course I couldn't resist the temptation of buying it and using it instead of olive oil. So the result was this:

700 g white wheat flour
100 g rye flour
2 tbs quick dry yeast
12 g salt
400 ml water
50 ml hazelnut oil
150 g moroccan black olives
100 g halloumi cheese
10 g fresh mint
1,5 tbs mince garlic paste

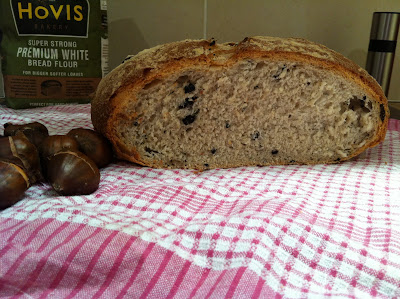
The dough was very difficult to knead, as it was very sticky and moist, even though you can see the water it's only 56%. I think the olives could added some water and the hazelnut oil made it sticky. So I had to knead and leave it rest a few times before I considered it was ready. Then two times of a hour and 15 min fermentation. The dough worked well and doubled it size both times. Here you can see it in the tray before putting in the oven:


I am using as Lidia the water in a tray in the oven instead of the spray: for me it's easier than open and close the oven a few times. 10 min with the tray with water at 240º C, then I took the tray and let the steam out of the oven, and another 35 min at 190º C. The bread didn't grown up a lot in the oven, but I think it was because it did it before. During the time it was in the oven, there was a lovely and strong smell in the house, mix of garlic, olives and hazelnuts. After that time, I left the bread inside of the oven off with the door open for a few minutes.

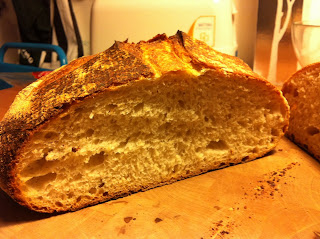
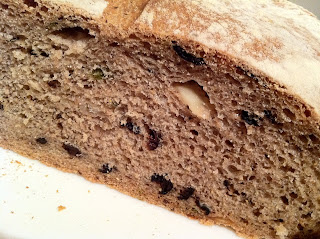
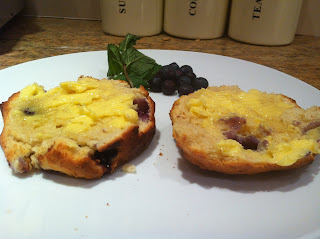
Dark color bread, not big alveolus but soft crumbs, I find the combination of all the flavors very interesting. Strong from the garlic (even a little bit spicy), salty from the halloumi and olives and refreshing from the mint. Looking forward to put something on the top or dip it in a sauce or just olive oil


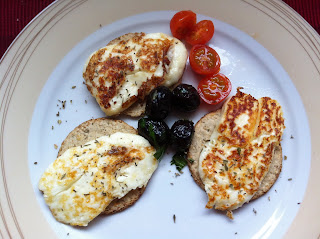
I used only half of the halloumi cheese, so while making the bread, because it was lunch time and I was hungry, and I love this cheese, I sliced the rest and grilled, placed them on top of scottish oatcakes, herbs, tomatoes and olives. Halloumi is the perfect cheese to be grilled (maybe together with the argentinian provoleta) because it has a high melting point, and it is even better if you do it in a barbecue. It has a distinctive texture, similar to mozzarella and has a salty flavour.


An this the the bottle of the hazelnut oil:

Happy new year 2011

Today it's the last day of 2010, when this blog was born. I want to wish a happy new year to Lidia and Almudena, and to everybody who read us during the year. I am sure 2011 will be a better year, a annus miribilis, and it will brings more and better breads.


lunes, 27 de diciembre de 2010

Pan de castañas..., ¿o una castaña de pan?

Había pensado en hacer esta entrada en inglés, porque parece que nuestras aportaciones en esta lengua son más populares para la comunidad internacional, según el apartado de estadísticas de este blog. Pero he pensado también que con este pan en concreto no tenía mucho sentido. Primero, porque hice este pan como un regalo para un amigo que es de Carabanchel -aunque esto no tiene mucho que ver, su inglés es muy bueno- y usar otra cosa que no fuese español no tendría mucho sentido entre nosotros. Y segundo, porque no tengo la menor idea de cómo trasladar el juego de palabras del título a la lengua su muy británica majestad Isabel II. Vamos, que no estaba de dios.

No he recibido feedback del resultado, pero estoy segura de que es un pan de miga bastante densa y para tomar con moderación o con nada más, porque parte de la harina es integral y lleva muchos tropezones, de manera que no subió mucho durante el horneado. Por lo tanto, es indudable que el pan es de castañas, pero también pudiera ser que sea demasiado pesado o incomible. ¿Por qué lo cuento aquí entonces? Porque sigo entusiasmada con los resultados estéticos que da la bandeja con agua para crear vapor y porque hoy tengo la vena optimista (que ya tiene su cosa...). Mirad la foto y decid si no es bonito.

Ingredientes
175 gr. de harina blanca de trigo
225 gr. de harina integral de trigo
235 gr. de agua
150 gr. de masa madre de trigo blanco
2 gr. de levadura seca de panadero
100 gr. de castañas, nueces y pasas (en total, pero sobre todo había castañas)
12 gr. de sal

Incluso si ha salido bien, no estará a la altura de su destinatario. Gracias, M.

sábado, 25 de diciembre de 2010

walnut and chestnut bread

Happy Christmas! Today I didn't work, as most of the people, and I have a really lazy day, not doing nothing, except for going for a walk, cook dinner and...bake a bread! And as Lidia but not on propose I baked as well a walnut and chestnut bread, although I think with no the same result. My bread didn't rise much and I think because I put to much walnuts and chestnut. Other thing that happened: the crust was to hard, the times were the same that I used before for this kind of bread but it looked that I overcooked it. Too crunchy. Anyway, the flavour was nice and I enjoyed the bread.


300 g sourghdough
375 g white flour
110 g water
10 g salt
60 g walnuts
60 g chestnuts


viernes, 24 de diciembre de 2010

blueberry scones


Freezing temperatures in Belfast (I am talking about minus 13). Very cold, although very beautiful at the same time. The snow from last week is still all around, not going anywhere, although became into ice. But it is white christmas.

So we these temperatures we can not really do much outside and we really want to be inside
with your heating on. And with a tea, and something with the tea. And what better than a nice and just baked scones.

I made these scones using buttermilk for the first time. I have to say that I liked what I got: powerful aroma, something between yogurt and cheese; the dough was quite moist and not easy to work with, but the result was very soft and tender scones. I add this time some blueberries. Gives a nice flavor but especially a wonderful color. Most of the blueberries break after baking and spread the blue color. You can eat them only with your eyes. Judge yourself.


Ingredients:

450 g self rising white flour
100 g caster sugar
1/2 tsp salt
175 g butter
250 ml buttermilk
150 g fresh blueberries


I mixed the dry ingredients and the added the butter and mixed until the consistency was similar to breadcrumbs. Then I added the buttermilk and mixed well. you don't have to work the dough much but be sure that all the ingredients are mix well and the dough is even. I made eight scones with the dough, cut them with a glass, and brushed the top with buttermilk. Oven preheated at 220 degrees and baked for 17 minutes.


I couldn't help eating one. So put the kettle, made a nice tea and spread some butter on top of each half when they were still warm.

Just a perfect evening. Almudena, as you like scones so try this recipe or just add some berries to the recipe you already has.


lunes, 20 de diciembre de 2010

eliopsomi


As I said in one of the comments to a Lidia's post, this week I felt to make some bread inspired in that beautiful and interesting part of the world, eastern mediterranean sea. I love this part of the world and especially the food, but also the beautiful landscapes, the history and the people. For that I need some mediterranean ingredients but as well some middle east ones. First ones, garlic, olive oil and olives, and for thesecond, mint.


I have lived and travelled many times to Greece. I can say it is one of my favorites places to go on holidays and to live, and I don't refuse the idea of living again there. This recipe has some of the basic ingredient of the greek cuisine, and it could be a greek bread, but this time I was inspired in another country: Cyprus.

I spent one month in Cyprus working there and it was a very good experience. Food is similar to greece but there is more influences of the middle east. the combination is superb.

This bread is called eliopsomi (lit. olives bread). There is a version called eliopita (lit. olives pita). But I wanted to make a load of bread, so I mixed a few recipes I had and add the basic ingredients for making a eliopsomi. And this was the result:

525 g super strong white flour
300 g water
1 tbs quick dry yeast
10 g salt
40 g olive oil
140 g black olives
1 tbs fresh mince garlic
4 g fresh chopped mint

I found last week in a delicatessen shop in belfast called Arcadia this super strong flour from Hovis. I never used a very strong flour (this one has 12.8 g of protein) and I want to know how much affect the result. By the way, in this shop sells sourdough baguettes, I tried one and I have to say I liked it. I meant to put more olives but I couldn't resist the temptation and ate a few of them.

10 minutes at 240 degrees with a tray with water, after that I took out the tray and the steam (and of course the kitchen fire alarm went on) and another 30 minutes at 200 degrees.

I have to say that this is probably one of the best breads I made or at least the one I liked more.
Very nice crust, very soft inside, olives, garlic and mint gave to the bread a nice aroma and flavor. I can't wait till the morning to put loads of things on top of it.

And yes, I used the oven as well to roast some chestnuts, i love them so i couldn't help putting them with the bread.
It might be a good idea to use a few left to make a bread with chestnuts. Any suggestions?

domingo, 12 de diciembre de 2010

Y aquí la tonta del pain a l'ancienne

Me gusta mucho hacer este pan porque te permite ser cool y un poco vaga al mismo tiempo. O sea, te da por hacer pan para mañana mismo y por tenerlo horneado y frío para la hora de comer, claro, pero no tienes la masa madre lista y con las fermentaciones largas que nuestro sacerdocio exige es, básicamente, imposible darte el capricho. Pues te haces un pain a l'ancienne. Refrescas la masa madre para tener la cantidad que te hace falta para la noche, mezclas los ingredientes y a la nevera. A la mañana siguiente, lo sacas del frigo cuando tú has salido de la cama, lo dejas atemperarse un poco mientras se calienta el horno, arrojas el engrudo sobre la bandeja como puedas y, si tu hora de levantarte no ha sido escandalosamente tardía, comes a mediodía con él en la mesa. Lo dicho, vaga y cool de un golpe.

¿A que son monas?
Esta receta es la misma que la que ya puse en esta entrada, con una ligera variación en la cantidad de agua: puse 280 en vez de 300 gr. porque buscaba un masa un poco más compacta con idea de poder formarla un poco. Y funcionó. Pero veréis en la foto que el resultado visual ha sido mucho mejor que otras veces y creo que ha sido por la forma de aplicar el vapor.

La semana pasada, en el Panforum, aproveché el encuentro con Bea, mi maestra en La cocina de Babette, para contarle mis problemillas con los greñados y el aspecto general final de mis panes, que saben ricos pero no lucen mucho estéticamente, la verdad. Bea me aconsejó crear vapor echando agua sobre una bandeja ya caliente que hubiera dejado en la parte baja del horno mientras se calentaba. De esta manera, se genera mucho más vapor que con el clásico frus-frus manual, lo tienes durante más tiempo no tienes que estar abriendo y cerrando el horno para vaporizar. Y el agua no cae directamente sobre la masa, cosa que, según había explicado Agustín Oliet en su taller sobre el vapor, parece que tampoco conviene.

Bueno, parece que la cosa ha salido bien. Las barras han quedado mucho más doradas e incluso se han abierto como si tuvieran greñado (cosa que no había). Me he quedado muy contenta con el resultado. ¡Gracias Bea!

sábado, 11 de diciembre de 2010

Lepard's lessons

Tenía pendiente contaros aquí algo de mi experiencia en el Panforum 2010 que se celebró la semana pasada en Madrid, un evento que reunió durante todo el día a algunas de las personas más representativas de este fenómeno de hacer pan artesano en casa en el que los que suscribimos estamos metidos.

Yo sólo pude asistir a los actos del programa que había por la tarde: conferencias sobre el porcentaje del panadero, la masa madre, el uso del vapor en el horneado y, ¡tachán tachán!, la intervención de Dan Lepard con motivo de la traducción al españo de su mítico The handmade loaf, que ha sido vertido a nuestra noble lengua por Iban Yarza (sí, Almudena, también estuvo él en persona).

Lepard, en plena explicación
La verdad es que a Lepard no se le puede negar que transmite entusiasmo por el pan y que lo hace de una manera muy sencilla y accesible. Teniendo en cuenta que allí había más de uno dispuesto a extender una alfombra bajo sus muy panaderos pies, fue muy cercano y amable.

Yendo a lo práctico, de las cosas que dijo me quedo con dos que me parecieron muy útiles, sobre todo por desmitificadoras. Muchos participantes preguntaron cuestiones relacionadas con las harinas, los porcentajes de proteína, el gluten, las características que tienen que reunir para que nos sirvan para hacer pan... Lepard fue muy clarito: no hay que agobiarse por eso. Si nos vamos doscientos años atrás, los panaderos no tenían la menor idea de cuál era el porcentaje de proteína que tenían las harinas que usaban, y sin embargo hacían un pan estupendo. Es más importante usar productos locales y que nos resulten próximos, así como respetar las tradiciones panaderas de cada lugar, que volverse loco buscando una harina con una determinada fuerza.

Otra cosa que a Juan le gustará mucho saber es que  sólo empleaba masa madre cuando era, según sus propias palabras, "joven y arrogante". Ahora también usa levadura fresca e incluso levadura seca, y así lo reflejan las recetas de sus libros.

En fin, una tarde interesante, en la que también conocí a personas a las que leemos en otros foros panaderos. Por cierto, el organizador, Javier Marca, de BAK, anunció que habrá Panforum el año que viene.

miércoles, 8 de diciembre de 2010

Toasted bread and marmite


Finally I had the bread for breakfast today even though the ulster fry was a strong temptation.

So I toasted two slices and made a tea. In one of the slices I spread butter and in the other marmite (yeast extract). I never tried it before but last week I saw a documentary in BBC where they tried to make home made yeast extract: basically they kill the yeast with salt (one thing that bread makers try to avoid religiously every time they make the dough) and to help the process they heat up the mix, so the result is a dark brown and very (very) salty sticky paste, with umami qualities. It is usually eaten as a savoury spread in bread and toasts or to give flavour to stews as a vegetarian alternative to beef extract.

It was delicious with the butter, and interesting with the marmite, as even very thin layer was enough to give a very strong and salty flavour to the bread.

martes, 7 de diciembre de 2010

Lilmu Bread

Finally a day off in Belfast after a couple of weeks. Very cold, all the city is cover in snow and ice, but it looks lovely. So I woke up early, had my bran flakes breakfast and hit the town. All morning and part of the afternoon doing some shopping and walking, what it means lot of money spent. But I enjoyed the day and I bought nice things, including some bread ingredients. And finally, after such a long time and missing it, I made some bread, first one in Belfast. Iunpacked my scale, the bowls and spray bottles and some flours I brought from Cork. The restof the ingredients I bought them locally.

I wanted to make a classic one, like my favorite pain a l'ancienne but as I had a creative day and after the last post of Lidia and Almudena, I decided to risk and be brave: loved the idea of apple and oaks bread, but at the same Almudena's cheddar cheese and mustard scones were very tempting, so, why not mix them both? And you have the result. I had to modify the recipe to make a bread, and as I didn't have to make some sourdough, I used dried yeast. Another modification was the mustard: instead of powder I bought yellow mustard seeds in Marks & Spencer. Here is the recipe:


50 g porridge oats
100 g boiling water
200 g irish apples
100 g water at 20 C
10 g dried yeast
350 g strong white flour
5 g salt
3 tsp yellow mustard seeds
50 g mild white cheddar cheese
some extra oaks for decoration


The process is the same Lidia used for her oats and apple bread. but I baked it for 15 min at 220 and then 25 at 190. the color outside was very dark I guess because of the cheese. And because all the ingredients, I think it didn't grow much but I am quite happy with the result: not big alveolus but very soft breadcrumbs, main flavour coming from the cheese but some sweatiness from the apple and a crunchy and very particular from the mustard seeds.

I tried it tonight but I want to see how is tomorrow morning forbreakfast, although it might have to wait as I
planned a ulster fry for tomorrow. looking forward to all that grease lol.
now let me know what you think about the combination but more important try to do it, maybe next time a little bit less of cheddar so we can appreciate more the flavour of the rest of the ingredients but despite of that the I think it is a nice bread.

lunes, 6 de diciembre de 2010

Pan de Manzana y Avena con ayuda de Lidia


Ha sido realmente difícil para mí manejar la masa, menos mal que Lidia me dio confianza y me ayudó a superar ese momento de pánico ...


¡Estoy muy, muy contenta!


Gracias, amiga.

La Tonta de los Scones


Ayer preparé una receta de Dan Lepard, scones con queso cheddar. Bueno, no exactamente porque en Nívar no pude encontrar English mustard (powder) ... pero aún así los scones nos han hecho inmensamente felices durante el ratito que duraron.

La receta dice así:

200 g plain flour (yo usé self rising)

2 tsp baking powder (que yo no puse)

2tsp English mustard powder (que en Nívar no había)

25 g soft butter

Small bunch of parsley (que yo lo guardo congelado)

175 g cheddar, coarsely grated

1 large egg, separated

50 ml cold double cream

25 g golden linseed or sunflower seeds (se me olvidó echarlas en el último momento, pero el próximo día no pienso fallar en eso)

Oven 200ºC en horno con ventilador.


A tener en cuenta, la masa es muy difícil de cortar. Incluso Dan Lepard en su receta dice que lo intentes cortar con un cortador, pero que si no puedes que lo cortes en cuadrados.


Ah, y en la masa se añade solo la clara del huevo, ya que la yema se usa para pintarlos antes de meterlos en el horno.


Si ya los habíais descubierto, perdonadme mi entusiasmo de principiante. Si no, hacéroslos esta semana, que están muy buenos.


Por cierto, Lidia, que mañana me pongo manos a la obra a ver qué soy capaz de hacer con la receta de tu última entrada.


Hasta pronto, queridos amigos.

martes, 30 de noviembre de 2010

Pan de avena y manzana estilo Lepard


Esta receta es de Dan Lepard y el resultado, salvando las distancias claro, es un pan muy jugoso, con un punto dulce y muy rico para comer untado con mantequilla salada.

Como la receta no lo especifica, no le hice greñado, cosa que, por otro lado, estéticamente no le ha hecho mal, porque no me suelen quedar bien.

Pan de avena y manzana
50 gr. copos de avena
100 gr. agua hirviendo
200 gr. manzana pelada y rallada (golden en mi caso)
50 gr. agua a 20 grados
100 gr. de masa madre trigo blanco
5 gr levadura fresca
250 gr harina de fuerza de trigo
5 gr. sal
Copos de avena para la cobertura

Los copos de avena se mezclan con el agua hirviendo y se dejan reposar mientras se preparan el resto de los ingredientes. Primero, se mezclan la manzana, la masa madre, el agua y la levadura fresca y luego se añade todo, avena incluida, a la harina y la sal. El método que usé fue el de los amasados cortos, con tiempos de descanso de una hora y media para cada uno de los descansos (con bastante frío en casa).

El horno, a 210 grados durante 30 minutos, y a 190 durante 20 minutos más. Lo hice el domingo y sigue blandito, blandito. Dejo un par de fotos. La de la miga muestra un par de tropezones de manzana que se escaparon del rallador (pero murieron después, bien comidos).

Podéis admirar sin pudor el delicado menaje que sirve de atrezzo. A mí también me encanta.

Enviaré esta entrada al Yeastpotting de Wild Yeast, ver si nos vamos haciendo populares.

miércoles, 24 de noviembre de 2010


Yeeeha! Here I come! A new version of Juan Carlos´scones. I used brown sugar and walnuts instead of raisins. And so we had yummy walnut scones and carne de membrillo for breakfast. Juan Carlos, thank you for showing Lidia how to make scones, and thanks to you Lidia, for those wonderful summer days in which we baked together.

See ya!

jueves, 18 de noviembre de 2010

Masa madre y semolina

En muchas recetas de pan que aparecen en blogs panaderos anglosajones se cita la semolina como el producto a utilizar para evitar que la masa se quede pegada a la bandeja de hornear. Pero con semolina, una denominación que por estos lares es poco frecuente y que alude a una sémola molida un poco más finamente de la que conocemos para las sopas, también puede hacerse pan. De hecho, la sémola se emplea habitualmente para hacer la pasta en sus formas más diversas.

Traje un paquetito de semolina integral de Irlanda y he estado buscando alguna receta en la que pudiera usarla para hacer pan. La encontré en el blog Wild Yeast y la he puesto en práctica con un resultado bastante bueno. Se amasa estupendamente y también se deja formar muy bien. Otro aspecto que llamó la atención de esta receta es que utiliza una cantidad pequeña de masa madre, un 15% del peso total. Yo tengo costumbre de usar un porcentaje mayor, porque me gusta el sabor que imprime al pan, pero lo cierto es que con esta cantidad más pequeña la textura de la miga queda más suelta, y el sabor sigue siendo muy bueno. Dejo aquí la receta y un par de fotos, los dos batards que salieron y la miga.

viernes, 8 de octubre de 2010

and now my own bread from the course

I was quite busy lately traveling because of work and this has had an effect in my baking bread. I made a few breads since I come back from Spain but I didn't post any since then. So today I'm going to put one, and starting from the first.

As Lidia said, we took part of this course in Madrid, making bread with sourdough. Very interesting, we learnt a few things and made a bread each one. I wasn't close to my house either (even farther away than Lidia) so I went to my friends house, ask for permission to use their fridge and cook the bread a few hours later. The result, lovely, good enough as they bread didn't survive that night. The best compliment was from Pau, as he said it reminded him the bread he used to eat in France. Me, very happy.

Here there are a few pictures so you can judge. The recipe it is the same Lidia put in the previous post.


miércoles, 29 de septiembre de 2010

Taller de pan de La Bakería

Juan y yo hemos participado juntos en un curso de pan artesano básico impartido por La Bakería en Madrid. De nuestro trabajo allí llevamos a casa sendas masas preparadas para terminar con la segunda fermentación y hornear. Los ingredientes para una hogaza de trigo blanco fueron estos:

150 grs de masa madre
325 grs de harina blanca
125 grs de harina de fuerza
265 grs de agua de grifo
10 grs de sal

Como yo vivo en provincias, no pude resistirme a aprovechar la estancia en Madrid para hacer algunas cosillas por allí, decisión que supuso que mi masa hiciese la segunda fermentación en el maletero de un coche durante más tiempo del aconsejable y en unas condiciones, ejem, digamos que mejorables.

Cuando llegué a casa, encendí el horno a toda prisa (a toda la prisa que es capaz de darse mi horno, que no es mucha), volqué una masa con aspecto de estar sobrefermentada y asumí que mi mal comportamiento seguramente derivaría en un pan básico en sus ingredientes y básicamente incomible. Pues no fue así.

Dejo aquí la foto como prueba de que hacer pan es tremendamente agradecido, a veces más de lo que uno merece. Mi maltratada masa se convirtió en una hogaza esponjosa y de buen sabor. Conste que no recomiendo, ni mucho menos, ser tan poco responsable. Pero me gusta que no haya que dramatizar.

miércoles, 15 de septiembre de 2010

Cadiz, el pan y los garbanzos

Las recientes vacaciones en Cadiz hand dado para mucho: sol, justo enfrente de La Caleta, comida, mucha y de todo, pero especialmente pescados y mariscos como no podría ser de otra forma: chocos, pijotas, cazón, tortillitas de camarones, y tinto de verano, para refrescar claro. Todo ello acompañado de uno de los mejores panes aunque quizás no muy reconocido: los picos. He prometido a un amigo que voy a intentar hacerlos cuando vuelva a Irlanda porque se hizo un gran fan de ellos. Pero eso será en un próximo y espero pronto post.

De Cadiz me traje algo que allí se usa mucho y que yo enseguida le busqué un uso panadero: la famosa harina de garbanzo que se usa para las también famosas tortillitas de camarones y para muchos rebozados. Fuera de allí, se utiliza mucho en la India para hacer pakoras o en Italia y en el Rio de la Plata para elaborar la Fainá. Pero a mi se me metió en la cabeza hacer un pan con esta harina, eso sí, no 100%, si no más bien añadir un poco y mezclarla con harina de trigo.

El pan que he decidido hacer es una pain a l'ancienne, como veréis, va siendo uno de mis preferidos por su sencillez en cuanto a tiempo necesario e increible sabor.

La receta que he seguido es esta:

350g harina de trigo
50g harina de garbanzos
8g sal
8g levadura fresca
320g agua

El metodo a seguir es el mismo que publiqué aquí para el pain a l'ancienne. El resultado fue muy bueno, 4 barritas crujientes, dulces y con connotaciones al garbanzo.

martes, 14 de septiembre de 2010

panaderias en madrid

por circunstancias varias tengo que estar en madrid durante 10 días, y una de las cosas que voy a hacer es visitar y comprar alguno de los panes que se amasan o importan aquí. Así que pregunté a lidia y me dijo que buscara en el blog el foro del pan, y allí encontre unas cuantas panaderías, cuanto menos interesantes. Así que para facilitarme la tarea y para facilitarla también a quien quiera hacerse un recorrido panadero por madrid, aquí podréis encontrar un mapa de google con todas esas panaderías. Ya iré comentando las que vaya visitando. Cualquier otra que me haya dejado, haced un comentario aquí e iré añadiéndolas al mapa.


View panaderias in a larger map

jueves, 2 de septiembre de 2010

Nueces y pasas en Granada

Esto de hacer pan no es una afición que pueda practicarse a medio gas. Al menos, es lo que me dicen las experiencias más cercanas que conozco. Te pica el bicho de la panificación casera y te entregas con un frenesí difícil de explicar a hacer pan, a leer sobre pan, a pensar en la próxima hogaza que harás, a fijarte en los lineales de la harina en cualquier supermercado que se te ponga a tiro... Ahí tenéis a Juan, al que me imagino de vacaciones y lanzando miradas de sospecha a esas barras de tan terriblemente vulgares que venden en tantos sitios de nuestra madre patria.

Vamos al lío. Recientemente ha comenzado a activarse la conexión granadina de este blog. La foto de más abajo es un testimonio de algunos de los resultados cosechados a lo largo de una semana de descanso estupenda, durante la cual hablar de pan y hacerlo fue uno de los puntos fuertes en esos días de reencuentro. Hubo pain a l'ancienne, pain de campagne, banana bread y el pan de nueces y pasas cuyos ingredientes paso a detallar:

- 200 gr. masa madre (of course)
- 225 gr. harina trigo integral extra coarse (irlandesa, ved la foto de las harinas algunas entradas más abajo)
- 175 gr.harina blanca de trigo
- 235 gr. agua
- 50 gr. nueces partidas
- 50 gr. pasas sultanas
- 12 gr. sal

Autolisis, amasado tradicional, un primer levado de tres horas, boleado y descanso dos horas y media más en un bol, antes de volcar sobre la bandeja del horno y greñar. Horno a 250 grados unos 15 minutos y 40 minutos más a 190.


La temperatura en la bella provincia de Granada durante la pasada semana fue, ejem, tirando a asfixiante. Este pan con nueces se comportó estupendamente en las fermentaciones y el horneado. Creció mucho en el horno, a pesar de tratarse de una masa muy pesada, con la harina extra coarse y los 'tropezones'. En cambio, para el que se ve al fondo de la imagen, el pain de campagne, el último levado debió ser un poco excesivo porque, aunque no se arruinó en el horno y el sabor fue muy bueno, subió un poco menos de lo que esperábamos. Por eso no ha sido elegido para protagonizar esta entrada. Como somos nuevos en esto, de momento creo que es mejor enseñar sólo lo más lustroso.

No tengo imágenes de lo que hicimos con el pan de nueces, pero es perfecto para el desayuno, levemente tostado y untado con una gruesa capa de mantequilla. Sí, he dicho gruesa, que este es un sitio para hablar de cosas ricas, no para ser políticamente correcto.

martes, 24 de agosto de 2010

kamut and barleycorn


After the big success with the pain a l'ancienne yesterday, i can't stop baking!. So after work today I wanted to try other type of bread so I check in Bertinet's book and I decided to follow his recipe for baguettes and already the white flour when I decided to experiment...very risky I'd say as I am kind of a beginner.

So looking in my flours I mixed kamut and bareycorn, both that I never use and decided to make the baguettes. Here is the recipe I used:

- 280g organic kamut flour
- 280g mix grain barleycorn flour
- 10g dried yeast
- 10g sea salt
- 350g water

I mixed the yeast with the flour and then added the rest of the ingredients with the scraper until the dough was firm enough to work with it in the table. I kneaded for about 20min and the left it resting for an hour in a bowl cover with a towel. After this hour the dough doubled and then I cut it in four and rolled it in baguettes, left them again another hour resting, where they doubled again.

This time I baked them at home, so no steam oven so I put a tray with water and spray water before put the bread: max oven at 240 degrees during approximately 12 min. The result was a compact bread but lots of nutty flavors, great smell.


Next day the bread was ok (actually I still have one baguette left and after 4 days it's quite good) so I took it to work to make my lunch: the bread won lots of flavors and textures when I toasted, so I put it back in the oven with some steam for a few minutes. I filled it up with some ginger pork, rocket, tomato and caramelized red onion, having spread olive oil in the bread. I have to say It was a really lovely lunch.

lunes, 23 de agosto de 2010

and now my turn: pain a l'ancienne

Finally I made my own pain a l'ancienne...and I loved it! Everything was by the book and that made me very happy and proud of me. I understood all that things that bread makers say about the feeling of baking your own home made bread, especially the first ones. I watched it, touched, smelled, showed it to everybody and of course ate, but sharing with friends and family. All is gone by now and I think this is a good sign. Now I can't wait to bake more, have to have a little bit of patience or I will spend all my free time (and some of my work too) kneading, mixing and baking. I wouldn't mind thou ;-)

So the bread I decided to make today it was pain a l'ancienne, very interesting and I was looking forward because Lidia was telling lots of things about it: a primitive bread, not need to knead just mainly mix well to have a good consistency. But the long rest in the fridge over night it will bring loads and amazing flavors. Outside it is very crunchy and the inside soft with big alveolus.


Lidia posted here a recipe that she adapted from a spanish blog about bread called madrid tiene miga (madrid has cramb) to used with sourdough instead of dried yeast. press here to check the recipe in this blog, as it is the one I used for my bread. As I said before here in the blog, I had a small accident with my sourdough and I am now in the second day of making another.

So this is the recipe I used:

380g of organic strong white wheat flour (from doves farm)
7g of salt
2.5g of dried yeast
300ml of iced cold water

I mixed the water with the water with 300g of flour using my scraper and leave it resting for 30 min as they said that the autolysis helps to work with the dough and you get a better result. After that time, I added the rest 80g of flour, the yeast and the salt, mix it well and leave it resting in the fridge for another 30 min, after that mixed it again with the scrapr and put it in the fridge all the night to slow the fermentation. This will make the bread more crunchy outside and with lauds of flavors (that's why we use iced cold water, to slow as much as possible the fermentation).

Next day, in my case 8 hours, I took the dough out of the fridge and brought it to work, so I left it outside for around 2.5 hours, so it doubled its size. I put the dough on a greaseproof paper and cut it with the scratcher in three part, giving them a baguette-ish size, not easy as the dough is very soft and you can really work with it. You have to put flour underneath and on top. I pre-heated the oven at 260ºC and put the doughs into it for 10 min at 250ºC and 20% of steam. I work in a restaurant and we have a good combi oven so you can play with temperatures and % of steam (from 10% to 100%) so I decided to try with 20%. After this 10 min I took out the steam and baked them for another 8 min with just 250ºC.

The result was a very good and crunchy breads, with bigs alveolus inside and an amazing flavor. Maybe the color was a little big dark for me, but it wasn't at all burn.


I can tell you that the bread is perfect for dipping, we ate most of them just dipping in olive oil. Perfect. Looking forward to bake more pain a l'ancienne, and use lidia's one with the sourdough.

One last thing. On july it was my birthday but as I spent 4 weeks working in dublin in a new restaurant opening I couldn't see some of my friends, so this weekend, Philippe, Gianmaria and Alessandro gave me a present: as they know I am baking bread now (and really enjoying it) they bought for me a book about breads and baking, bread matters, by Andrew Whitley. I took a look to the book last night before I went to bed, it seems to be very interesting, as it is not only about baking, recipes and techniques but it has a big first part about why to bake your own bread and not to buy industrial ones; then of course it has a very good selection of all types of breads and recipes. Thanks guys, I appreciate and be sure I will use it and bake some bread for you.

sábado, 21 de agosto de 2010

Pain a l'ancienne

Supongo que el nombre de pain a l'ancienne tiene que ver con que se trata de un pan muy básico; un tanto, digamos, primitivo. La manipulación es mínima, no se amasa, apenas se forma porque no se deja y los ingredientes son elementales. Lo descubrí en el blog Madrid tiene miga que, a su vez, citaba como fuente de inspiración para la receta a uno de los gurús de esto de la panadería artesanal casera, Peter Reinhart. Pero la receta empleaba levadura fresca y yo hice una adaptación para usar masa madre.

Prometí a Juan colgar esta receta, con la que también podrá empezar a darle trabajo a su masa madre. Los ingredientes para un kilo de masa al 70% de hidratación son estos:

475 gr. de harina blanca de trigo
300 gr. de agua muy fría
225 gr. de masa madre de trigo blanco
16 gr. de sal

Sólo hay que mezclar la harina con la masa madre, el agua (importante que esté casi helada) y la sal. Este pan no se amasa, se mezcla lo justo para que los ingredientes formen un engrudo de aspecto poco prometedor que se guarda convenientemente protegido en la nevera durante toda la noche. Mantener esta masa a una baja temperatura es muy importante, porque el frío retardará la acción de las levaduras y la fermentación será muy lenta, lo que desarrollará más matices de sabor en el pan. Yo incluso uso una cuchara de madera o la rasqueta de plástico para mezclar, y lo hago muy rápido, para evitar tocar la masa y que se caliente.

A la mañana siguiente, se saca el pan del frigorífico y se deja un par de horas más o menos para que coja temperatura ambiente. Después toca el momentazo de pasarlo a la bandeja de hornear muy enharinada. Esta cantidad de masa da para un par de piezas o tres y podréis encontrar métodos que hablan de cortarla en el número de piezas que queráis y formarla antes de pasar al horno. Yo confieso aquí y ahora mi incapacidad para ambas cosas. La masa queda inmanejable, así que lo que hago es verterla sobre la bandeja en un par de vuelcos, intentar que quede alargada y aceptar con humildad mis limitaciones panaderas. Si ponéis un poco de harina por encima, el aspecto final será más rústico. Y si esa harina es de maíz, además quedará más crujiente.

Diez minutos de horno a 250 grados y unos 35 minutos más a 190 grados. El resultado visual, al menos que el que yo consigo, no es espectacular, pero es uno de los panes más ricos de sabor que hago.
Dos hogacitas recién salidas del horno

La miga es densa y esponjosa. En contra de lo que uno espera cuando mira con aprensión ese engrudo pastoso, el pan sube en el horno y tiene alveolos.

La cosa tiene miga
He hecho alguna vez variedades añadiendo hierbas a la masa (romero, tomillo, orégano...), que también da muy buen resultado. Probadlo en un bocata de jamón o con algún plato de los de mojar en la salsa. Pero no hagáis planes para después, porque seguramente no seréis capaces de comer sólo un poco.

jueves, 19 de agosto de 2010

dan on tv


I know that japanese food is not really much relative with bread and this blog, but dan was this morning in a tv show, Ireland am, cooking a great dish, stir fry rice. I was with him in the studios, great experience. press here to watch the video. and try to do it at home! it's very easy and taste.

miércoles, 18 de agosto de 2010

Un mundo de harinas

Los que saben de cocina insisten siempre en que la calidad de los productos es esencial para conseguir un buen resultado en un plato. Y acceder a una buena calidad en la materia prima está muy relacionado con la existencia de variedad en el mercado, es decir, con la posibilidad de que el consumidor pueda elegir. A mayor competecia, mayor esfuerzo por parte de los productores para hacerse un hueco en el mercado aportando mejoras en sus productos. Una obviedad, vaya.

Para hacer pan, la madre del cordero está, cómo no, en la harina.. En el año y medio que llevo haciéndolo en casa, he tenido ocasión de comprobar que hay grandes diferencias en cuanto a la oferta harinera que existe en distintos países. Y, me duele en el orgullo patrio reconocerlo, en España no salimos muy bien parados de la comparación. Acceder a harinas de distintos cereales y cultivo orgánico es una tarea que requiere un cierto esfuerzo en Madrid capital, es ardua en su cinturón metropolitano (experiencia personal), y me imagino que próxima al imposible en otras provincias o pueblos, por lo que leo en los blogs panaderos que sigo.

Por eso, durante mi viaje a Cork literalmente aluciné con la oferta de harina disponible. En cualquier supermercado a la vuelta de la esquina era posible encontrar harinas para panificar, de trigo blanco, integral, con grano partido, espelta... Pero mi gran momento harinero tuvo lugar en el English Market que, además de ser un sitio estupendo para la vista y el gusto, tiene su hueco para harinas de lo más variadas: trigo blanco, trigo integral, trigo sarraceno, kamut, garbanzos, espelta, centeno, cebada, semolina, arroz, maíz en varios tipos de molienda...Muchas de ellas de cultivo orgánico. Un gran momento.

Los ha habido similares en París y Londres, pero éstas son grandes capitales en todos los sentidos y me parece lógico que se pueda encontrar prácticamente cualquier cosa de manera relativamente sencilla. Pero Cork es una ciudad mucho más recogida, así que su situación me parece envidiable.

Mi margen de maniobra con el peso de la maleta no era muy amplio, así que tuve que contenerme. Me he traído de Irlanda tres kilos y medio de harina (y medio de azúcar mascabado, pero ésa es otra historia): extra coarse wholemeal, rye y semolina. Os las enseño en la foto. Por cierto, el paño tan mono también es irlandés.


lunes, 16 de agosto de 2010

Bertinet and Stevens

All day raining in dublin, summer is over in Ireland and autumn and winter is ideal to stay at home reading and making breads. After work I spent some time in a bookshop near the restaurant in city center and of course I bought two books: temptation is too big inside there. One of the books is a well know but I didn't have it: Dough - Simple Contemporary Bread by Richard Bertinet , nice book with very good pictures and a good introduction about how to make bread. Then a quite few recipes. Very interesting with simple explanations. There is a dvd enclose with the book where bertinet explains in a 30 min video how to make bread. Very useful specially for those, like me, who are very visual.


The second one I bought today is Bread by Daniel Stevens, from the River Cottage. I have to confess that I had no idea about this book, the author or the River Cottage, but they very interesting. River Cottage have different projects, courses, a local produce store of food and drinks, books and dvd, a canteen, all with a philosophy of self-sufficiency, food integrity, and consumption of local, seasonal produce.Take a look at their website. The book is impregnated with these principles. It has a good and big introduction about how to make bread, lots of practical information, including how to make a clay oven and a good selection of different recipes. All in a beautiful and very handy handbook.


Looking forward to read the books and practice some of the recipes but as I said before, now it's the time to do it as the cold and rainy seasons are coming.

lo prometido es deuda

Como dije en el comentario al post de lidia sobre la masa madre, pongo aqui la foto que hice de la masa madre después de volver a alimentarla otra vez durante dos días con harina de trigo integral. Después de añadir 70g de harina y otros 70g de agua sobre los 50g de masa madre que tenía, me quedo el bote por la mitad, y cuando volví de trabajar este fue el resultado: se había más que doblado como ocurrió al segundo día de hacerla.

Así y como conclusión sólo para este caso, a la masa madre no le gustó un pelo que la intentáramos "blanquear" con harina de trigo blanca, porque las demás condiciones fueron iguales, quizás como dice lidia quizás por crecer demasiado necesitaba mas alimento. Ahora ya esta descansando en el frigorífico esperando a que vuelva de Dublín, donde estoy dando unas clases de cocina a jugadores de rugby, y pueda hacer un pan con ella. Deseadme suerte.

sábado, 14 de agosto de 2010

Cuitas con masa madre primeriza

Juan ha contado en su entrada del viernes 13 de agosto nuestra experiencia con su primera masa madre. Partimos de harina integral y agua a partes iguales y mucho antes de lo que esperábamos (seguíamos las indicaciones del tutorial de Iban Yarza), la masa se puso como una moto al segundo día. Sin embargo, como queríamos ir transformándola en una masa madre blanca, cambiamos su alimentación a harina de trigo blanco.

viernes, 13 de agosto de 2010

lidia bread

lidia was here in cork for a week with eva and paula. we had a great time, visiting the island, lovely places like cobh, kinsale, killarney, etc, but we had time to cook and bake and to create this blog. So our main aim was and is to share recipe in the distance as we three live in different cities and myself in a different country, so we can put here attempts and doubts and discoveries and questions mainly about bread but also you will find some baking. And while sharing between us we can share with everybody else and enrich this blog with people who want to participate too. so do not be shy.

we made my sourdough, starting with strong wholemeal flour, and after 2 days the sourdough was crazy: double every 12 hours, millions of bubbles and overflowing the glass jar. So we decided to made a white sourdough so we fed it with strong organic white flour. i think this change didn't like it, didn't die but its activity is very slow since then. i m going to feed it today with strong wholemeal flour and put it finally in the fridge. and let's pray it is ok.

so as we said before, while waiting for the sourdough we made a couple of breads, using fresh yeast. the first one, the one i called lidia bread, was a strong flavour wholemeal bread. here is the recipe:

500g organic spelt flour
150g organic wholemeal rye flour
150 strong wholemeal flour
30g fresh yeast
17g salt
400g water

the bread has two fermentation of around 3 hours and then oven for 50 min, first 15 min at maximum temperature (in my oven it's around 140 celsius degrees) and the at 190 degrees. we put some water in a tray underneath the bread, and we wasn't able to spray the bread with water basically because we forgot to buy the spray bottle :-) but it came finally crispy enough.


so the result was a lovely and rich brown bread, during the fermentation the dough grew quiet well but in the oven we didn't get many alveolus, maybe because of the yeast, maybe because it has a high proportion of wholemeal flour or even because of the oven, as it was too close to the top inside of it. Nevertheless the texture and the flavour was unique. lidia promised she is going to try to make it again using this time her sourdough so i am really looking forward for her to make it and share with us. i am sure she will improve it.


and as the bread has only one destiny to fulfill, we all had dinner with it that night, and our food was enhanced with this powerful homemade bread. here you can see a sample with tapenade, semi sun dry tomatoes and feta cheese. it s true as well as lidia said the this bread get even better if you toast it. i m getting hungry again ;-)

jueves, 12 de agosto de 2010

And Sourdough was born

And sourdough was born. It happened suddenly and unexpectedly. Yes, we had all the conditions and tools but we didn't expect such a quick result. We were prepared to be feeding our mix of flour and water  for four days, but after the first one it was already there. Bubbling, growing and spreading that incredible flavour. It was almost ready but it was too soon, we had to have patience and not try to make bread from the very first moment. Our head was finally stronger than our feelings: deadlines must be respected. This is something that making sourdough bread teaches you and it's one of the best gifts this experience brings to you.

Sourdough Connection. Three friends in three different parts of the world, Madrid and Granada in Spain, and Cork in Ireland, linked not only by friendship but also by willing to share breads, and bread recipes and experiences and even more (don't worry, everything will be about cooking). We have to say sorry to Almudena, one of the three, because she doesn't know yet. But she will.

Next step will be the birth of the first bread. While waiting for the sourdough to be ready, we tried baking some breads using fresh yeast (Polish, by the way) and mixing different flours: first one, spelt, wholemeal and rye.

we used polish fresh yeast this time, good one